 Margins and Paper
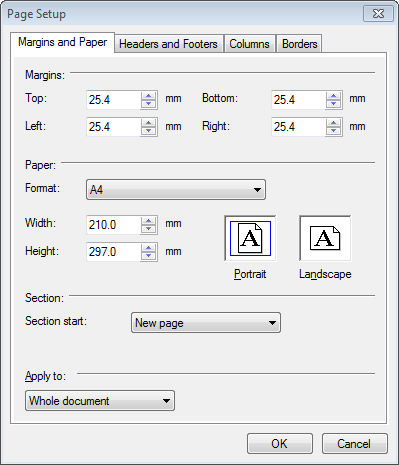
Margins
Here you can change the width of all your margins. They will
default to 25.4mm all round (one inch) but are easily changed by using the
up and down arrows to the left of each selection. Alternatively you can
click into the margin boxes and overtype the number shown. The minimum
margin size depends upon your printer.
Paper
The default is A4 Portrait (210mm wide and 297 high) but this is
easily changed. Use the dropdown menu ‘Format’ to change your paper size.
You have an amazing 134 standard sizes to choose from, plus the option to
set a custom size. If you wish to set a custom size, select that option from
the list and then overtype the Width and Height, or use the up/down arrows
until your desired size is displayed. It’s also very easy to change from
Portrait to Landscape, and vice versa, simply by clicking in either the
Landscape or Portrait box. If you have already created a custom size for
your pages, changing the paper orientation will automatically swap the width
and height settings without losing your customisation.
Section
Set to ‘new page’ as the default and can be changed to
‘continuous’. If you insert section breaks in your document, using this
feature will default to automatically start a new page. Changing the default
to ‘continuous’ simply means a new section will start without a page break.
Apply To
This defaults to ‘whole document’ and can be changed to ‘section’
to allow different margins, paper and orientation for a segment within your
document where you have used the ‘section’ function.
Headers and Footers
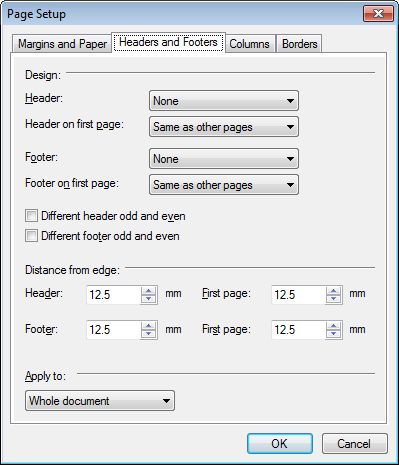
Design
This section allows a great deal of flexibility for your headers and
footers. For both the Header and Footer individually you can select:
- None (no header or footer)
- All Sections Equal (headers are the same on each page, footers are the same on each page)
- All Sections Different (each header/footer can be completely different)
You can also select these options for the Header and Footer on the first page only. Ableword allows you to select different headers and footers for odd and even pages also by clicking into the check box for these options.
Distance from edge – these values determine how far the header and footer
are inset from the left hand edge of your page. Again, you can select
different values for the first page of your document. To change these
values either click into the white box and overtype the existing values, or
use the up and down arrows. The default settings are 12.7mm (half an inch)
for header, footer and first page.
Apply To – this defaults to ‘whole document’ and can be changed to ‘section’
to allow for different header and footer settings for each segment within
your document where you have used the ‘section’ function.
Columns
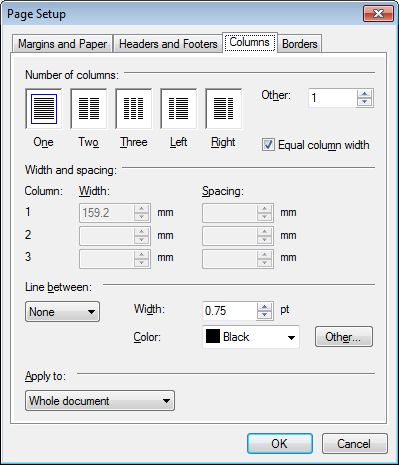
This tab allows you to easily produce a newspaper/newsletter-style layout.
Number of Columns
The default number of columns is 1, but can simply be
changed to however many columns you desire. There are buttons to select 2 or
3 equal columns and 2 columns with one thinner, one thicker column. However,
you can also use the ‘Other’ feature and increase the number of columns to
however many you want. There’s a check-box to make all columns equal size so
if you want each column to have a different width, simply click on the tick
to remove it.
Width and Spacing
Here you can change the sizes of each of your columns,
when you have more than one column. Ableword will automatically complete
these values when you select more than 1 column, including how much space to
show between columns, but it’s a simple matter of using the up/down arrows
(or clicking into the boxes and overtyping the values) to change your column
widths and the spacing between each column.
Line Between
The default setting is none. If you have more than one column
in your document, you may wish to separate each column by a line. If you do,
change this setting from ‘none’ to ‘single’. You can also change the
thickness of this line and the colour. Ableword allows you to even customise
the colour of this line!
Apply To
This defaults to ‘whole document’ and can be changed to ‘section’
to allow for different column settings for each segment within your document
where you have used the ‘section’ function.
Borders
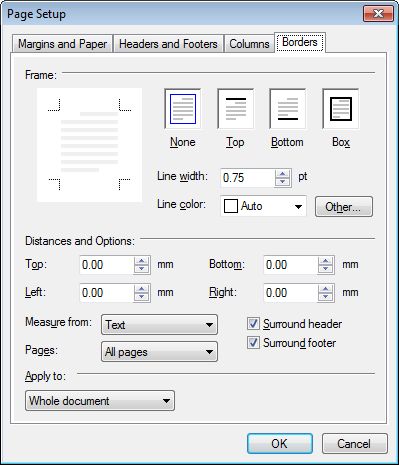
This tab allows you to insert outline boxes around your text. This is another useful feature to help you produce professional newspapers and
newsletters but also can be used to outline text for notices, invitations
and the like.
Frame
The default is no frame but you can select to have a line at the top
or bottom of your document, or a box simply by clicking into the relevant
box. The line is a fine 0.75pt but this can be increased or decreased by
using the up/down arrows to the right of the Line Width box, or by
overtyping the number showing. You might also want to choose a different
colour for these lines by using the dropdown list for Line colour or
clicking on the ‘other’ button to customise your colour choice.
Distances and Options
Here you can specify how far away you want the
border to be. The Measure From feature allows you to say whether to measure
the distance from the edge of the document (so from the outside inwards) or
from the text (so from the text outwards). You can also choose to put a
border around the header or footer – the default is no border around these.
Ableword gives you the choice of which pages to apply these settings – all
pages, just the first page or all pages except the first page.
Apply To
This defaults to ‘whole document’ and can be changed to ‘section’
to allow for different border settings for each segment within your document
where you have used the ‘section’ function.